English
 русский
 Español
 简体中文
简体中文
Where Changeover Time Actually Disappears on a Lathe
Most shops track cycle time obsessively, yet the biggest hidden cost on a CNC lathe rarely happens during cutting. It happens between jobs, when a...
Read More
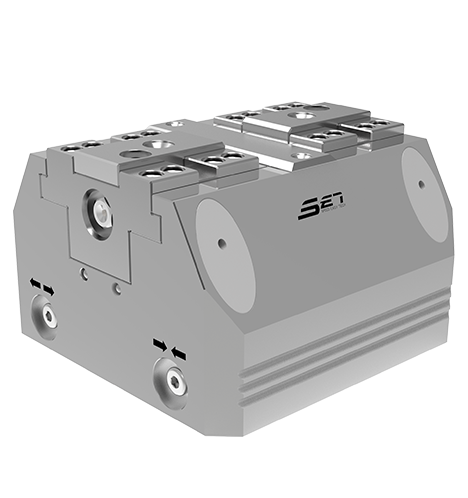
How Self-Centering Vises and Pneumatic Systems Transform Zero-Point Workholding Precision
Precision Workholding Engineering
Modern multi-axis CNC machining demands workholding that keeps pace with sub-micron tolerances, fast changeovers, and lights-out automation. This guide examines how Pneumatic Vise Systems and self-centering vise technology integrate with zero-point systems to deliver consistent, repeatable, and high-productivity setups across complex part families.
Why Workholding Accuracy Defines Machining Outcomes
Every tolerance stack-up in a machined component traces back to a single origin: how confidently the raw material or semi-finished workpiece was located and clamped. When workholding introduces even 0.02 mm of positional scatter, that variance propagates through every subsequent operation. Finishing passes, inspection results, and assembly fits all reflect errors born at the fixture.
Self-centering vises address this at the root. By applying symmetric clamping forces from both sides simultaneously, they eliminate the off-center drift that single-jaw designs permit. Paired with a zero-point base system that relocates pallets to within 0.002 mm of a fixed datum, the combined stack achieves total positional repeatability that rivals dedicated fixtures, at a fraction of the setup time.
0.002mm
Typical zero-point repeat accuracy
80%
Setup time reduction vs. conventional fixtures
5x
More part faces accessible per clamping
How Self-Centering Vises Work: The Mechanical Principle
A self-centering vise (also written as self centring vice or centering vice) uses a bidirectional jaw drive. A central lead screw with opposing thread directions moves both jaws inward at equal rates. The workpiece is automatically positioned on the geometric center of the vise body, regardless of its actual width, as long as the part falls within the jaw stroke range.
Key Mechanical Elements
- Bidirectional lead screw: Left-hand and right-hand threads machined to matched pitch tolerances, ensuring jaw travel symmetry within 0.005 mm across the full stroke.
- Hardened jaw inserts: Replaceable serrated or soft-jaw inserts allow adaptation to round, square, or irregular profiles without sacrificing grip.
- Floating jaw alignment: Precision guide rails prevent jaw rocking under cutting loads, maintaining parallelism to the machine axis.
- Force amplification: Wedge or toggle mechanisms multiply applied torque into clamping force, commonly yielding 15 to 25 kN from a moderate tightening torque.
Concentric Clamping Accuracy in Practice
Concentric clamping accuracy is the metric that quantifies how close the actual workpiece center sits to the theoretical vise center after clamping. Premium manual self-centering vises achieve 0.01 to 0.03 mm concentricity; pneumatically actuated versions with servo-controlled jaw feed can reach 0.005 mm or better. This precision matters most in turned-then-milled components where the lathe datum must align with the milling datum without re-indicating.
Pneumatic Self-Centering Vises: Automation-Ready Clamping
An automated pneumatic vise replaces the manual tightening torque with regulated compressed air, typically at 5 to 6 bar working pressure. A double-acting cylinder drives the jaw mechanism, and the self-centering geometry ensures the workpiece is captured on axis at every cycle. Clamping force remains constant regardless of operator technique, which eliminates one of the largest sources of part-to-part variation in manual setups.
Performance Characteristics at a Glance
| Parameter | Manual Self-Centering | Pneumatic Self-Centering | 5th Axis Pneumatic |
|---|---|---|---|
| Centering repeatability | 0.01 to 0.03 mm | 0.005 to 0.01 mm | 0.003 to 0.008 mm |
| Clamping force consistency | Operator-dependent | Pressure-regulated | Pressure-regulated |
| Cycle time (clamp/unclamp) | 15 to 45 s | 1 to 3 s | 1 to 3 s |
| Integration with automation | Manual only | Full robot/PLC | Full robot/PLC |
| Typical clamping force range (kN) | 5 to 20 | 10 to 35 | 15 to 50 |
| Suitable for 5-axis machining | Limited | Yes (low-profile models) | Optimized |
Force Regulation and Safety Circuits
Pressure regulation is essential to avoid under-clamping (part release during cutting) and over-clamping (deformation on thin walls). A precision regulator combined with a pressure switch wired into the CNC as a clamp-confirm interlock ensures the spindle halts if pressure drops below threshold during a cycle.
For thin-walled aluminum or copper parts, reducing line pressure to 2 to 3 bar and using wide-face soft jaws spreads the load without surface marking -- an advantage over hydraulic alternatives that typically operate at fixed high pressure.
Zero-Point Systems: The Foundation for Fast Changeover
A zero-point pallet system (also called quick-change workholding) uses precision clamping bolts or shanks that locate and lock into receiver units built into the machine table or tombstone. Location repeatability of 0.002 mm or better is achieved through tapered or spherical locating surfaces ground to sub-micron tolerances. Once a zero-point receiver is mapped to the machine coordinate system, any pallet with a compatible shank relocates to that same datum every time.
Integration Workflow
The power of this workflow is that steps 1 and 2 happen simultaneously at a pre-setting station while the machine is cutting. Spindle idle time is limited to the few seconds it takes to dock the next pallet and confirm the clamp signal. Facilities operating multiple pallets in rotation report spindle utilization increases of 20 to 35 percentage points compared to conventional single-station setups.
5th Axis Vise Design: Unlocking Multi-Face Access
A 5th axis vise (also called a 5 axis vise) is a low-profile workholding unit engineered to minimize interference with the rotary axes of a 5-axis machining center. Standard vise bodies are too tall and wide for trunnion-style machines; 5th axis designs reduce the vise body height and jaw footprint while retaining the self-centering principle and the required clamping force.
Design Priorities for 5-Axis Workholding
- Low profile body: Jaw height below 60 mm keeps the cutter reach requirement short, preserving rigidity in long-reach conditions.
- Pull-down clamping action: Jaws that pull the workpiece downward onto a precision-ground support rail eliminate float and ensure a flat datum contact.
- Open-side geometry: Reducing the vise body width gives the spindle clearance to approach all four vertical faces and one horizontal face without fixture collision.
- T-slot or zero-point mounting: Direct compatibility with zero-point receiver modules means the 5th axis vise benefits from sub-0.005 mm repositioning accuracy at every pallet swap.
- Stainless or nitrided steel surfaces: Chip and coolant resistance maintains jaw guide precision over long production runs.
A 5-axis vise that positions the workpiece centerline 80 mm above the machine table allows the rotary axis to fully tilt without vise body interference on parts up to 120 mm tall -- a geometry check that must be confirmed in CAM simulation before first article machining.
Multi-Axis Fixture Planning Checklist
- Confirm maximum part height versus vise body height and trunnion clearance envelope.
- Verify that the clamping force is sufficient for the heaviest interrupted cut in the program.
- Simulate all B- and C-axis rotations in CAM to detect vise body interference at every angle increment.
- Select jaw inserts matched to the workpiece material: serrated for steel, smooth aluminum-face inserts for soft alloys.
- Set pressure regulator and record the confirmed clamp pressure in the job traveler.
- Run a first-article inspection at both 0-degree and maximum tilt positions to confirm datum stability under cutting loads.
System Integration: Combining Pneumatics, Self-Centering, and Zero-Point
The highest-performance configurations layer all three technologies: a pneumatic self-centering vise on a zero-point pallet, operated through a CNC-controlled solenoid valve and pressure switch. The control logic ensures the machine will not start cutting unless the zero-point receiver is confirmed locked and the vise pressure switch reports the target clamp pressure.
Control Architecture
| Signal | Source | CNC Interlock Action |
|---|---|---|
| Zero-point locked | Receiver proximity sensor | Enable pallet-mounted air supply |
| Vise clamp pressure OK | Pressure switch on vise circuit | Release spindle start permission |
| Pressure drop during cycle | Continuous pressure monitor | Feed hold, spindle stop, alarm |
| Zero-point unlock request | Program M-code or robot PLC | Vent vise first, then release zero-pt |
Rotary Table and Tombstone Configurations
On horizontal machining centers with rotary indexing tables, multiple self centering vises are arranged on a tombstone or cube fixture, each served by a common manifold of pneumatic circuits. A four-sided tombstone with two vises per face holds eight workpieces per cycle. Because zero-point receivers are mounted in each vise position, the entire tombstone is pre-loaded offline, then docked to the machine table in one motion. Production changeover times fall between 3 and 8 minutes for a tombstone swap, versus 45 to 90 minutes for traditional refixturing.
Selecting the Right System: Key Specification Criteria
Matching configuration to production requirements is straightforward when decision factors align with system attributes, as shown below.
| Production Scenario | Recommended Configuration | Key Specification |
|---|---|---|
| Low volume, high mix | Manual self-centering + zero-point pallet | Jaw range 0 to 160 mm, 0.02 mm repeatability |
| Medium volume, batch runs | Pneumatic self-centering + zero-point pallet | 15 to 25 kN clamp force, 0.01 mm concentricity |
| High volume, automation cell | Pneumatic 5th axis vise + robotic pallet pool | 1 to 3 s cycle, pressure interlock, 0.005 mm repeat |
| 5-axis complex parts | Low-profile 5th axis vise + trunnion zero-point | Body height under 65 mm, pull-down jaw action |
| Thin-walled aerospace parts | Reduced-pressure pneumatic + soft jaw inserts | 2 to 4 bar range, full-contact soft jaw, deformation under 0.01 mm |
Jaw Range and Stroke Considerations
Jaw stroke is the total per-jaw travel from fully open to fully closed. Standard units cover 0 to 125 mm or 0 to 200 mm of workpiece width. A single jaw range typically covers a complete part family without changeover. When widths fall outside range, step jaws or stacked parallels extend reach without replacing the vise body.
Maintenance, Calibration, and Longevity
Workholding accuracy degrades with wear, chip contamination, and inadequate lubrication. A structured maintenance protocol extends calibration intervals and protects the investment in precision components.
Recommended Maintenance Schedule
- Daily: Clean jaw faces and guide rails with compressed air. Check for chips lodged behind jaw inserts. Inspect air line fittings for leaks.
- Weekly: Apply manufacturer-specified grease to lead screw and guide rails. Verify clamp-confirm pressure switch setpoint against a calibrated gauge.
- Monthly: Measure jaw parallelism with a dial indicator. Acceptable deviation is typically less than 0.01 mm across full jaw face. Inspect zero-point shank tapers for wear or fretting marks.
- Quarterly: Complete centering accuracy verification using a known test piece of precisely measured width. Document results and compare against baseline. Replace jaw inserts if repeatability exceeds 0.02 mm.
- Annually: Return vise body to metrology lab for full inspection of lead screw pitch uniformity and jaw guide rail straightness.
Zero-Point Shank Care
The zero-point shank taper achieves sub-0.003 mm repeatability and must be kept free of chips, coolant residue, and surface damage. Best practice: wipe the shank and receiver with a lint-free cloth before every dock cycle, store pallets on a hanging rack to avoid nicking the taper, and inspect for fretting under magnification at quarterly intervals.
Frequently Asked Questions
Q1: What is the difference between a self-centering vise and a standard machine vise?
A standard machine vise moves only one jaw; the fixed jaw acts as the locating datum. This means the workpiece center shifts with every different part width. A self-centering vise moves both jaws simultaneously, keeping the part on the same geometric centerline regardless of width. This is essential when the machine program references a fixed center datum and the operator needs to clamp parts without adjusting fixture offsets between sizes.
Q2: Can pneumatic vise systems match the clamping force of hydraulic vises?
Standard pneumatic vises at 6 bar typically produce 15 to 30 kN of clamping force, which covers the majority of milling and drilling applications on steel and aluminum. Hydraulic vises can reach 80 to 150 kN, making them preferable for heavy roughing of tough alloys. Many facilities use pneumatic vises for finish operations and lighter cuts, reserving hydraulic clamping for roughing stations. Hybrid pneumatic-hydraulic intensifiers also exist that multiply pneumatic input pressure to generate hydraulic-level force from a standard compressed air supply.
Q3: How does a zero-point system achieve 0.002 mm repeatability?
Zero-point receivers use hardened, precision-ground tapered locating surfaces. When the shank is pulled in under spring or pneumatic force, the taper geometry self-corrects minor misalignments during docking. Mating surfaces are lapped below Ra 0.2 micrometers, and the large contact area distributes pull-down force without local yielding. These factors together produce repeat positioning accuracy that rivals precision collet chucks.
Q4: What jaw inserts should be used for aluminum versus steel workpieces?
For steel workpieces, serrated jaw inserts with a tooth pitch of 1 to 1.5 mm provide high friction and resist pull-out under heavy cutting forces. For aluminum and other soft metals, smooth or cross-hatched inserts with a wide contact face distribute load without marking the surface. Soft aluminum inserts that are machined to match the part contour are ideal for thin-walled or finish-machined surfaces. A general rule: if post-clamping surface marks are visible and unacceptable, switch from serrated to soft-jaw configuration.
Q5: Is it possible to use self-centering vises on a 3-axis machine and later migrate to 5-axis?
Yes, and this is a common adoption path. A zero-point compatible self-centering vise mounted on a standard 3-axis machining center establishes the datum infrastructure. When the facility adds a 5-axis machine, the same pallets dock directly to the new machine's zero-point receivers, and only the upper vise body needs to be replaced with a low-profile 5th axis model. The offline pre-setting workflow, part programs referenced to the zero-point datum, and operator procedures carry over largely unchanged, reducing the learning curve of the new machine considerably.
Q6: What air supply specifications are required for a pneumatic self-centering vise?
Most pneumatic vise systems require clean, dry compressed air at 5 to 7 bar with sufficient flow to fill the actuator cylinder within 1 second. A dedicated filter-regulator-lubricator (FRL) unit is strongly recommended to prevent moisture and particle contamination from degrading cylinder seals. Air lines should be sized to avoid pressure drop under simultaneous auxiliary demands; typical inside diameters are 8 to 12 mm for single-vise installations.
latest news

- How Quick Change Tool Shanks and Octagonal Taper Zero Point Locators Cut CNC Lathe Setup Time
- Low equipment utilization rate and lengthy workpiece setup time on 5-axis machine tools? Zero-point quick-change tooling completely eliminates the pain point of inefficient tool setting.
- How Pneumatic and Manual Vise Systems Redefine Precision Clamping on Vertical Mills
- Micron-Level Precision Lockup | SET Zero-Point Clamping Systems Power a Revolution in Turn-Mill Flexible Machining
Latest news
-
Low equipment utilization rate and lengthy workpiece setup time on 5-axis machine tools? Zero-point quick-change tooling completely eliminates the pain point of inefficient tool setting.Introduction High-end 5-axis machining equipment has become standard infrastructure across precision mold, aerospace, new energy vehicle, 3C precision component, hydraulic valve and automation manufac...Read More
-
How Pneumatic and Manual Vise Systems Redefine Precision Clamping on Vertical MillsThe Clamping Challenge Behind Every Vertical Milling Operation Every finished part coming off a vertical milling center depends on one variable that rarely gets the attention it deserves: how the raw...Read More
-
Micron-Level Precision Lockup | SET Zero-Point Clamping Systems Power a Revolution in Turn-Mill Flexible MachiningOverview As high-end turn-mill composite machining becomes increasingly critical for aerospace, military, automotive, and precision mold manufacturing, traditional fixture clamping and manual setup p...Read More
-
How Manual Ball Lock Systems and Zero-Point Workholding Cut Changeover Costs by 60% in Flexible ManufacturingThe hidden cost of workholding changeovers in low-volume high-mix shops Every minute a CNC spindle waits for a fixture change is margin erased. In low-volume high-mix production, traditional clamp...Read More
-
Optimizing 5-Axis Machining: Integrating Dovetail Fixtures and Zero-Point Pallet SystemsFive-axis machining has redefined what is geometrically possible on a single setup. Yet the fixture holding your workpiece is just as critical as the machine's kinematics. Without the right workholdi...Read More
If you are interested in our products, please consult us
Contact Details
- Address: 1-4 Floors, 17#03, Building 17, No. 269, Xinfeng Road, Xukou Town, Wuzhong District, Suzhou City
- Fax: +86-18112607008
- Tel: 18112607008
- Email: [email protected]
Products
Quick Link
News Center
Mobile terminal
Copyright © Zero Point Clamping System ALL RIGHTS RESERVED.